• How to Assign a Badge to a User via the Web Application

    Learn how to assign a Badge to a user using the web application.

    2 minute task

    What

    Assigning a Badge links the device to a specific caregiver. This allows Nobi to log visits, time spent, and provide clear insights on care provided.

    Why

    By assigning a Badge to a user, each visit becomes visible. You can see how long a caregiver spends with a resident and spot trends or workload imbalances. This helps improve transparency and decision-making. With insights from Badge data, you can optimise shift planning and ensure better care distribution. Plus, it reduces manual tracking and increases trust within teams.

    It is also possible to assign a badge to a user using the Nobi Mobile App.


    Detailed steps

    To assign a Badge to a user, follow the steps below.

    Please note that this action can only be completed on the Nobi web application via the User management page. Access to this page is restricted to managers only.

    1. As a manager, click the cog/gear in the top right corner to access User management. 
      How to Assign and Unassign Smart Badges - Step 1.png
    2. Locate the user you wish to assign the Badge to and click Edit.
      How to Assign and Unassign Smart Badges - Step 2.png
    3. Navigate to the Badge tab.
      Assign a MAC Address to a User - Step 4.png
    4. Click Assign.
      Assign a MAC Address to a User - Step 5.png
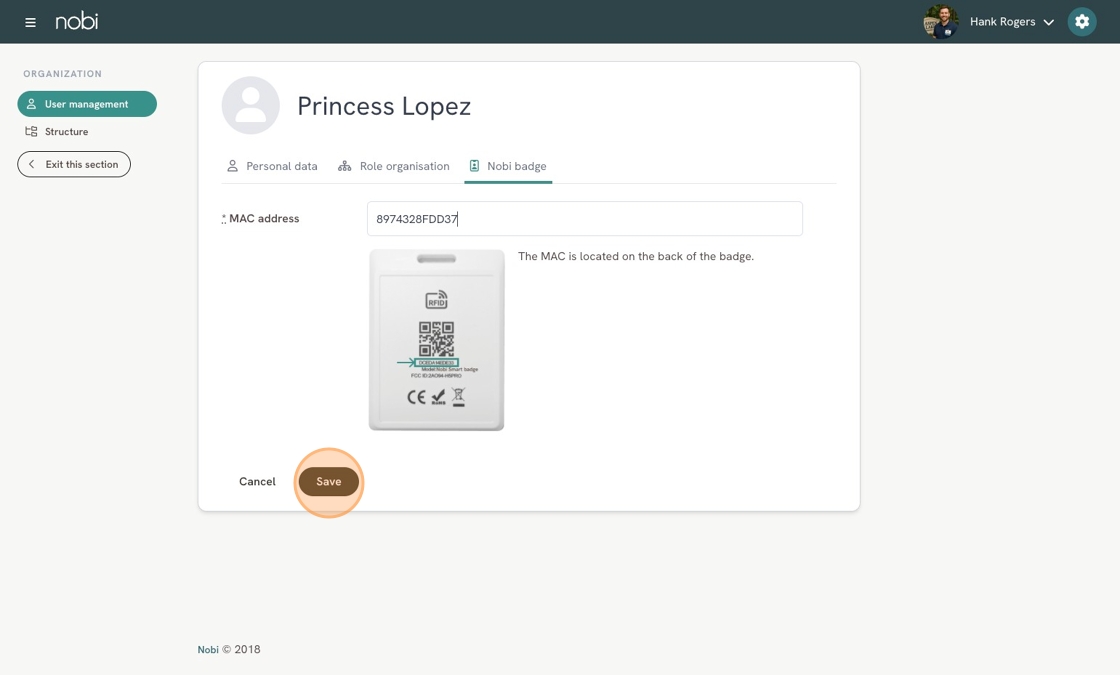
    5. Enter the MAC address of the Badge, which can be located on the reverse side of the physical badge. Then click Save
      Assign a MAC Address to a User - Step 6.png
    6. To activate a new badge, press and hold the button on the badge for three seconds, as instructed.

    You have now assigned a Badge to a user.

    For information on how to unassign a Badge from a user, click here.

  • How to Configure Language Settings

    In this article you will learn about the languages that Nobi supports and how they are applied at different levels.

    1 min task

    What

    Nobi currently supports 16 different languages and dialects. Within the Nobi application, these languages can be set for individual users as well as for residents.

    For users and at site / community level, the language setting determines the language of the application (web and Nobi Mobile App) and the language used for audible escalation alerts.

    For residents, the language setting determines the spoken voice from the Nobi light, for example voice confirmations and the morning greeting. Learn more about when and why Nobi speaks here.

    Why

    The broad language support ensures that all residents and users can interact with the Nobi light and the Nobi application in the language they feel most comfortable with. Nobi can also communicate verbally with residents in their chosen language, helping residents feel at ease and more confident when using the system.


    Supported Languages 

    Nobi currently supports the following languages:

    •  
      • Dutch (including Belgian Dutch)

      • English (US, UK, Australia)

      • German (including Swiss German)

      • French (including Canadian French)

      • Danish

      • Swedish

      • Norwegian

      • Hungarian

      • Spanish

      • Portuguese

      • Italian

      • Japanese

    Detailed steps

    To change your user language settings, follow the steps below.

    1. Click your name in the top right corner of the screen and select Edit profile.
      Updating Profile and Resident Information in Dashboard - Step 2.png
    2. Change the language via the dropdown menu.
      Updating Profile and Resident Information in Dashboard - Step 8.png
    3. When you're finished click Save
      Updating Profile and Resident Information in Dashboard - Step 9.png

    To change the language settings for a site / community, follow the steps below.

    1. From the dashboard, click Site / Community in the left menu.
      Updating Profile and Resident Information in Dashboard - Step 11.png
    2. Change the language via the dropdown menu via the Basic info tab.
      Updating Profile and Resident Information in Dashboard - Step 12.png
    3. When you're finished click Save
      Updating Profile and Resident Information in Dashboard - Step 13.png

    To change the language settings for a resident, follow the steps below.

    1. From the dashboard, click Residents in the left menu.
      Updating Profile and Resident Information in Dashboard - Step 15.png
    2. Navigate to the resident that you want to change the language settings for by clicked Edit.
      Updating Profile and Resident Information in Dashboard - Step 16.png
    3. Change the language via the dropdown menu via the Personal data tab.
      Updating Profile and Resident Information in Dashboard - Step 17.png
    4. When you're finished click Save
      Updating Profile and Resident Information in Dashboard - Step 18.png

    You have now successfully changed the language settings for users, sites / communities, and residents. 

    Still have questions? Contact Nobi Support.

  • How to Edit Room Type/Name

    In this article, you will learn what how to edit the type of room and the name of that room.

    2 min task

    What

    In Nobi, a "room" refers to a specific space within a housing unit. For example, a housing unit may include a bedroom, a living room, and a bathroom. Each of these is considered a separate "room" in the housing unit.

    For more information on Room types and their consequences, click here

    Why

    In the Nobi application, every light is paired with a room. For best organisational practices, we highly recommend defining room types and adding optional room names to help better distinguish rooms and housing units. This is especially useful in housing units with multiple rooms and lights.       


    Detailed steps

    To edit the type of room and that room's name, follow the detailed steps below.

    1. From the dashboard, navigate to the Housing Unit tab in the left menu. 
    2. Click Edit on the Housing Unit you wish to edit.
    3. Navigate to the Rooms tab.
    4. Press the three dots below the existing room that you wish to edit.
    5. Click Edit Room.
    6. Select the corresponding room type, such as Bedroom or Living Room. You can also choose to give that room an identifying name. 
    7. When you're finished, press Save.  
    8. A green banner will confirm the changes. 

    You have now successfully edited a room type within a housing unit. 

    Still have questions? Contact Nobi Support.

  • How to Enable/Disable Automatic Lighting

    In this article you will learn how to enable and disable Nobi's Automatic Lighting feature.

    2 min task

    What

    By enabling the automatic lighting feature, the Nobi light will illuminate when it detects someone entering the room, and can automatically turn off someone leaves the room. This feature can be enabled for all Nobi and Nobita lights. 

    Why

    The automatic lighting features helps to prevent falls by illuminating the room when a resident enters. Residents don't have to worry about fumbling for a light switch when returning to their rooms in the evening. 

    The light can also be set to automatically turn off when it detects someone has left the room. This way residents never have to worry again about switching the light off when they leave. You can also set a custom time as to how long the light will remain on before going off.


    Detailed steps

    To enable or disable the Automatic Lighting feature, follow the steps below. 

    1. From the dashboard, navigate to the Housing Unit tab in the left menu.
    2. Select the housing unit which you would like to enable to disable the Automatic Lighting feature for by pressing Edit.
    3. Click the Rooms tab.
    4. Click the three dots under the room that you want to enable/disable the feature for.  
    5. Click Edit Device 
    6. Here you can tick the box to either turn light on automatically or turn light off automatically
    7. If selecting the latter, you can input a custom time the light will remain on before turning off (starting when the room is completely empty). 
    8. When you're finished, click or press Save at the bottom of the screen.  
    9. A green banner will confirm the changes.

    The automatic lighting feature has now been enabled or disabled. 

    Still have questions? Contact Nobi Support.

  • How to Enable/Disable the Morning Greeting

    Learn what the greeting in the Nobi application is all about and how to activate it for a resident.

    2 min task

    What

    Once activated, the greeting feature delivers a once daily messages to the resident through the light. It starts the morning with a "Good morning" greeting and provides a short weather forecast. On special occasions, the light also wishes the resident a happy new year or happy birthday.

    The morning greeting does not play at a fixed time. After 5:30 AM, Nobi waits until the resident has been in the room and out of bed for three minutes without interruption. This ensures the greeting never wakes the resident up. Nobi only greets the resident once they are awake and out of bed.

    Note that this feature is only available for single-person housing units and individual Jack and Jill rooms.

    The voice of the greeting cannot be changed and is determined by the resident's language settings. 

    Why

    The greeting feature offers daily routine and helps the resident get used to the light's voice. This way, if there's a fall, the resident won’t be startled by the light asking about the fall. Since some people might prefer not to have the light talk, the greeting feature is turned off as a default setting.


    Activating the greeting

    Activating the greeting is simple and is done within the Housing unit settings of the resident.
    Note that you can only activate this feature if you’ve allowed the light to speak when a fall is detected. Unsure if you’ve allowed this? Find out using the guide Sound settings. If you haven’t allowed this, Nobi has no voice and won’t be able to greet the resident.

    You can also have an overview of your residents' Housing unit settings via the Resident Insights

    Detailed steps

    1. Click on Residents in the left menu.
    2. Locate the resident for whom you want to activate the greeting and click edit.
    3. Choose the Housing unit tab.
    4. Enable the Greeting switch to ON. Please note, voice confirmation must be on.
      Note: If there are multiple rooms in the housing unit, select the room where the greeting should play. We recommend choosing the living room, so early bathroom visits do not trigger the greeting.
    5. Click Save.
    6. A green banner will confirm the changes.


    You have now enabled the greeting for this resident.

    Still have questions? Contact Nobi Support.

  • Sound Settings

    Discover the different options of Nobi’s voice and how to activate it.

    2 min task

    What

    You can toggle the voice function of the light on or off during escalations or for morning greetings, based on resident preferences. When activated, Nobi can ask residents if they've fallen and offer reassurance. If the resident answers “no," an escalation won’t be triggered and the unit will be snoozed for 10 minutes. If deactivated, the light will still support two-way communication during escalations, provided the volume is above zero. Note that disabling the voice function will also turn off the greeting function.

    Please note: only managers can adjust these sound settings. 

    Why

    Activating the fall confirmation enhances comfort by providing verbal reassurance to residents, making them feel attended to and secure. Even if help has not arrived yet, the resident knows that help is on the way. Choosing to deactivate the voice can be beneficial for residents with cognitive impairments who may find a talking light disturbing, ensuring the environment remains as comfortable as possible for all.


    What Nobi will say

    Below you see what Nobi will say when the voice is activated. Note that Nobi will only say it is calling a person when you’ve configured phone numbers in the escalation procedure.

    Type of escalation Confirmation  If answer is not clearly “no” Reassurance (phone number in escalation procedure)
    Fall [Name Resident], did you fall? (waits a few seconds for an answer) We’re calling for help, one moment. Please stand-by, we’re calling [Name of person with phone number]
    Call button / pull cord / Wearable call button version 1 You’ve requested assistance. We’re calling for help, one moment. N/A Please stand-by, we’re calling [Name of person with phone number]

    Activating Nobi's voice

    If you've chosen to enable Nobi's voice feature, let's go ahead and activate it. The voice feature is found under the ‘housing unit settings’ of a resident.

    You can also have an overview of your residents' sound settings via the Resident Insights.

    Detailed steps

    1. From the Dashboard, click Residents in the left menu.
    2. Select the resident for whom you want to activate the Nobi voice and click edit.
    3. Go to the Housing unit tab.
    4. Choose the voice setting you want under sound.
    5. When you’re done, click save.
    6. A green banner will confirm the selection.

    You have now activated the voice of Nobi for this resident.

    Learn more about more about when and why Nobi speaks here.

    Still have questions? Contact Nobi Support.

  • How to Add a Cluster

    Learn what a cluster is and how to create one in this guide.

    10 min task

    What

    In the Nobi application you can create clusters. A  is a group of one or more sites / communities and/or clusters together under one umbrella.

    Clusters can only be created by a user with a manager role on account level. You also need to already have at least two sites / communities. To add an extra site / community, please contact your vendor.

    Want to know more about the whole structure of the application? Go to Account structure and hierarchy.

    Why

    Clustering sites / communities helps create a clear structure within your organisation. By grouping sites / communities based on their location, you get a better overview of the entire setup. You can then assign users to these clusters, giving them access to all sites / communities within the cluster.

    Learn how to assign these users using our guide Assigning users to account/sites/communities/clusters.


    Adding a cluster

    Some users should be able to see every site/community, and some only one. Adding a cluster solves this user rights issue and can only be done by a user with the manager role on account level.

    Detailed steps

    Please note that this action can only be completed on the Nobi web application via the User management page. Access to this page is restricted to managers only.

    1. Click the cog/gear in the top right corner. 
      How to Add a New Cluster in Nobi Cloud - Step 1.png
    2. Go to Structure in the left menu.
      How to Add a New Cluster in Nobi Cloud - Step 2.png
    3. Click on Add a cluster next to the current structure of the entire account.
      Add a Cluster in Nobi Cloud Dashboard - Step 3.png
    4. Name the cluster and click Save.
      Add a Cluster in Nobi Cloud Dashboard - Step 6.png
       
    5. To nest other items under this new cluster, simply click on the item you want to nest under the cluster.Add a Cluster in Nobi Cloud Dashboard - Step 7.png
    6. Then choose the correct Parent from the dropdown menu.
      Add a Cluster in Nobi Cloud Dashboard - Step 8.png
    7. When you’re done, click Save.
      Add a Cluster in Nobi Cloud Dashboard - Step 9.png

    You have now successfully assigned an item to your cluster. In the overview you will now see this item nested under the cluster.

    Still have questions? Contact Nobi Support.

  • How to Set Escalation Causes

    In this article, we’ll walk you through what escalation causes are in Nobi and how to add them.

    10 min task

    What

    In the application, Nobi allows you to specify different causes for every escalation. Once you’ve added these, Nobi will ask you to choose the escalation cause when closing an escalation. If the cause is not clear yet, you can always add it afterwards. Since there are different types of escalations (fall, call, assistance call), Nobi allows you to set separate escalation causes for both types.

    Why

    Adding escalation causes helps you see the overall trends in your organisation’s escalations. You might discover patterns, like falls being due to fatigue, or occurring due to a resident’s new medication. With this knowledge, you can take proactive measures to prevent future falls, making these insights a crucial part of your wider fall prevention plan.


    Adding escalation causes 

    Adding escalation causes is simple and can be done on the site / community level.

    Detailed steps

    1. Go to Site / Community in the left menu
      Adding Escalation Causes in Nobi Dashboard - Step 1.png
    2. Navigate to the Escalation causes tab.
      Adding Escalation Causes in Nobi Dashboard - Step 2.png
    3. Click on + add.
      Adding Escalation Causes in Nobi Dashboard - Step 3.png
    4. Next, fill in the name of the cause and a description to give more information about the cause.
    5. Choose the Escalation type of escalation wherefore you want to add an escalation cause by using the dropdown menu below. It is possible to set escalation causes for Falls, Calls, Assistance calls (with resident), and Assistance class (without resident).
    6. When you’re done, click add.
      Adding Escalation Causes in Nobi Dashboard - Step 7.png

    Now you have successfully set up an escalation cause. 

    For more information on using escalation causes, click here.

    Still have questions? Contact Nobi Support.

  • How to Configure an Escalation Procedure

    This guide will explain what an escalation procedure is and how to set it up.

    5 min task

    What

    When a fall occurs or the call button has been pressed, help is required quickly. Nobi achieves this by contacting the right people through the right channels. This is done through what we call an escalation procedure

    Nobi sends alerts through four different channels: a nurse call system, by calling and sending a text message, in-app notification, or via email. You can set up different escalation procedures on different levels within the organization. At the site level, department level, and at the housing unit level. 

    Why

    Without an escalation procedure, Nobi cannot alert you of a fall. It is important that you configure the escalation procedure in such a way that each resident can be assisted as fast as possible in case of a fall. Each situation is different, therefore flexibility is possible. In order to be able to offer help as quickly as possible, specific care providers can be allocated via specific channels.


    Setting up an escalation procedure  

    To set up an escalation procedure, you need to choose the appropriate channel(s) to get notified of a fall. Different channels have different urgency levels and also communicate differently:

    Channel Urgency Communication Recommended
    Call / sms actionable One by one in order  Mandatory
    Email informative all at once Optional
    In-app notification informative all at once Optional
    Nurse call system actionable depending on system Optional

    Since the configuration of the nurse call system is handled within its own system, we won’t go into further detail about this option here. Even if you only work with a nurse call system, we recommend always adding at least one phone number. This way, Nobi will call this number if the connection with the nurse call system is down. 


    To effectively respond to each resident’s fall, you can set the escalation procedure at three levels. The three levels, from the highest priority to the lowest are: site, department, and housing unit. While you can set up multiple procedures, Nobi always uses the escalation procedure set at the lowest level. For instance, if you have a general procedure for a department but create a unique one for a housing unit, the housing unit procedure will be used for escalations in this specific housing unit, overruling the department procedure.

    Setting up an escalation procedure: use case

    Detailed steps

    1. Go to site in the left menu.
      Add Employees to Escalation Procedure on Nobi Dashboard - Step 6.png
    2. Choose the escalation procedure tab.
      Add Employees to Escalation Procedure on Nobi Dashboard - Step 7.png
    3. To add a phone number, select phone number, click +add.Add Employees to Escalation Procedure on Nobi Dashboard - Step 8.png
    4. Add a number manually or choose a user from the list below and click Done.
      Add Employees to Escalation Procedure on Nobi Dashboard - Step 10.png
    5. To add an email address, select Email as a channel click +add.
      Add Employees to Escalation Procedure on Nobi Dashboard - Step 11.png
    6. Either fill in a name and an email address manually or choose a user from the list below and click Done.
      Add Employees to Escalation Procedure on Nobi Dashboard - Step 13.png
    7. To add an in-app notification, select App notification as a channel, click +add.
      Add Employees to Escalation Procedure on Nobi Dashboard - Step 14.png
    8. Choose the user who will receive the notifications. Please note that this user needs to have notifications enabled on their mobile device and be logged in in order to receive push notifications. When you're finished click Done.
      Add Employees to Escalation Procedure on Nobi Dashboard - Step 16.png

    You have now created an escalation procedure on the site / community level.

    Still have questions? Contact Nobi Support.

  • How to Configure Technical Issues

    In this article, we’ll walk you through how to set up technical issues for users in the Nobi application.

    7 min task

    What

    Technical issues will allow you to immediately get notified if there are any malfunctions with the lights, their peripherals, or other integrations. You can choose which users will receive these notifications. All technical issues will also be logged in Technical issues in the left menu.

    Why

    Configuring technical issues will immediately alert you to any problems, like if the light isn’t connected to WIFI or a peripheral needs charging.

    Each technical alert must be assigned to at least one user. This ensures that every problem is seen by someone who can take action.


    Setting up technical issues

    Setting up the technical issues is done on the site / community level. Under the Warnings tab you will need to select a user to receive certain/or all technical issues.

    By default, users will receive an email via the address they used to log into Nobi. 

    Detailed steps

    1. Go to Site / Community in the left menu.
    2. Click on the Warnings tab at the top of the screen.
    3. Navigate to the user and click edit.
      (If the user's profile has a phone number, they'll get notifications by both email and SMS)
    4. Tick the boxes of the different technical issues you want to be sent to this user.
    5. Click Save.


    Now the selected user will be notified whenever a technical issue occurs.

    Still have questions? Contact Nobi Support.

  • How to Configure Monitoring Events

    In this article we’ll walk you through what monitoring events are and how to set them up.

    5 min task

    What

    Nobi monitoring events are special alerts for key activities of residents. These include five specific triggers: Resident sitting on the edge of the bed, resident out of bed, resident in bed, resident out of room, or resident in bathroom.

    Please note, for the resident in bathroom trigger, a Nobita installed in the bathroom is required. The out of room trigger only functions if the entire housing unit is covered by Nobi or Nobita lights.

    Why

    For some residents, certain activities are more dangerous than others. Therefore, you may want to monitor and/or be alerted of these events for residents’ safety. Monitoring events allow you to customize the appropriate action taken for certain activities of certain residents.


    Setting up a monitoring event

    There are several ways to customize the monitoring events:

    Trigger: Choose which monitoring event you want to be monitored. For multi-person and Jack & Jill housing units, only the In Bathroom trigger is possible.

    Time/Day: Select which days and time frames the monitoring will be active.

    Thresholds: Choose when to receive the alert if Nobi sees the trigger. You can set the threshold to immediate or after a certain time has passed.

    Actions: Decide which steps Nobi takes when these conditions occur. Options include Dashboard and Mobile Notifications. 

    • Only log in report
    • Show on dashboard
      • Show on dashboard: Sends a visual alert to the dashboard, along with an audible alert if sound on the dashboard is enabled.  
    • Mobile Notification
      • Notification: A standard push notification is sent to users who are signed into the Nobi Mobile App and have enabled notifications. The notification briefly describes the event so they can open the app and check the details. When this option is selected, the monitoring event will also show on the dashboard and be logged in the report. 

        When the notification is pressed, and pulled down, more information regarding the monitoring event will be displayed:
      • Pop-up with sound in app: A full-screen visual and audible alert with details of the event pops up on the mobile device for those users signed in the the Nobi Mobile App. This makes sure the event is noticed immediately. If a user has already accepted an ongoing escalation and is assisting, they will not receive this full-screen alert. (The option is currently only available on Android mobile devices.) When this option is selected, the monitoring event will also show on the dashboard and be logged in the report. 

    Regardless of the chosen action, or if no action is selected, the event monitoring data will always accumulate in the Overview of Monitoring Events

    You can also have an overview of a resident's set monitoring events via the Resident Insights

    Detailed Steps

    Monitoring events can be configured on the site / community, department, or resident level. Configurations defined on the site / community level apply to all residents, whereas those defined on the department level only apply for the residents in that department. Monitoring events defined on a resident level only apply to that specific resident.

    Setting up a monitoring event follows the same steps, no matter which level you choose. 

    1. Go to Community in the left menu
      Configuring Bathroom Monitoring Settings in Nobi - Step 2.jpeg
    2. Go to the Monitoring configurations tab.
      Configuring Bathroom Monitoring Settings in Nobi - Step 3.jpeg
    3. Click on +Add.
      Configuring Bathroom Monitoring Settings in Nobi - Step 4.jpeg
    4. A wizard will launch to guide you through four steps:
      1. Select your trigger - which event should be monitored? Click Next.
        Configuring Bathroom Monitoring Settings in Nobi - Step 7.jpeg
      2. Select the day(s) and time range when Nobi will monitor this event. Click Next.
         
      3. Choose a threshold - How long does the trigger need to be true to execute the action(s) and click Next.
        Configuring Bathroom Monitoring Settings in Nobi - Step 22.jpeg
      4. Choose the action Nobi should take - If no option is selected, events will still be added to the monitoring overview. When notifications or a pop-up alert is selected, the monitoring events will also show on the dashboard.
        Configuring Bathroom Monitoring Alerts In Nobi - Step 8.jpeg
    5. When you’re done, click on save.
      Configuring Bathroom Monitoring Alerts In Nobi - Step 6.jpeg
    6. You have now configured a monitoring event. The monitoring event will appear under the Monitoring configurations tab. 
      Configuring Bathroom Monitoring Alerts In Nobi - Step 7.jpeg

    You have now set a monitoring event. 

    Still need help? Contact Nobi Support.

  • How to Configure Escalation Images

    In this article we’ll go over the different types of escalation images and how to choose between them.

    3 min task

    What

    When Nobi detects a fall, a press of the call button, or a pull cord call, it creates an escalation. In an active escalations or once an escalation is closed, Nobi can show images to aid in learning and prevention. These images can be set at four levels of privacy— no image, image with stick figure view of the resident, blurred images, or the actual image of the escalation.

    Why

    Choosing the type of escalation data has an impact on how much you can learn from an escalation. Choosing no image will leave you with nothing to work with. The stick figure and blurred images are still limited in detail but gives a bit more information. The actual image can help you the most with analysis.


    Types of escalation images

    If you select "actual image," you will be able to see the real footage of the escalation along with a stick figure helping you by defining the resident’s detected pose. Choosing stick figure or blurred images will only show a limited picture of the event. Choosing 'no image' leaves you without visual information to learn from the escalation.

    Type of image How private? How recognisable is the resident? Shows room as is? Visibility?
    No image Most private None No  None
    Stick figure Medium privacy Some (stick figure) No, shows last picture of empty room Abstracted
    Blurred image Medium privacy Some (blurred) Yes, blurred Obscured
    Actual image Least privacy A lot (real image) Yes, live background Yes, most

    You can also verify your residents' privacy preferences via the Resident Insights.


    Choosing an escalation image

    Selecting the right type of image is crucial. While you can get some information out of stick figure images, the background (and also furniture) does not change in this view during an escalation. If a resident trips over a chair which they have just moved, for example, it would not be visible in the images. The blurred images will show the room in it's current state, but blurred. Only the actual images will show this. For more guidance about how the stick figure works in Nobi, check out the page What is a stick figure?
     

    Setting up the type of escalation image

    Once you’ve made your choice about the type of images you want to consult in case of a fall, you can simply set this up under the privacy settings of the specific resident.

    Detailed steps

    1. Go to Residents in the left menu.
    2. Navigate to the resident and click on the edit button.
    3. Go to the privacy settings tab.
    4. You can make your choice between the different types of escalation data. Click on the type you want.
    5. Click on save.
    6. A green banner will confirm the update.

    You have now changed the type of escalation images for this resident. This will now be applicable for future fall and resident call escalations.

    Still have questions? Contact Nobi Support.

  • How to Enable/Disable Live View

    In this article we’ll walk you through what Live View is and how to set it up.

    3 min task

    What

    Live view allows you to see a simplified, stick figure representation of the resident when they are in their room but not in bed. To protect privacy, only the stick figure’s posture is shown, placed over a background image of the room that was captured when it was last unoccupied. Smart Monitoring must be active in order to see the Live View. When activated, this feature allows staff to can see the Live View of the by clicking on the resident’s name in the dashboard. 

    The Live View only portrays the stick figure representation of the resident. No actual images of the resident are ever available via Live View, only the stick figure representation.

    Please note: that this feature is only available for Nobi lights, not for the Nobita. 

    Why

    Live view in Nobi is really useful for keeping an eye on residents. If there's a fall, live view can help caregivers see what's happening fast so they can react quickly. It's also handy for regular check-ins on residents, without disturbing them.


    Live View Preview

    Once enabled for the resident, the live view is accessible from the dashboard by clicking on the resident card. 

    The Live View will also be available during open fall escalations and housing unit-related calls. 

    For more information on checking the Live View, click here.

    For step-by-step instructions on where to consult the live view during an open escalation, visit our guide here.

    Enabling Live View

    Enabling live view is simple and can be done under the privacy setting of the resident.

    You can also view the status of the Live View via the Resident Insights.

    Detailed Steps

    1. Go to Residents in the left menu.
    2. Choose the resident for whom you want to activate live view and click edit.
    3. Go to the Privacy Settings tab.
    4. Enable the live view switch to ON.
    5. Click Save.
    6. A green banner will confirm the action.

    You have now enabled Live view for this resident.

    Still have questions? Contact Nobi Support.

  • How to Enable/Disable the Night Light

    This article explains the Nobi light's Night Light feature and shows you how to set it up for a resident.

    3 min task

    What

    When activated, the night light helps the resident by gently illuminating the room as the resident gets out of bed during night. The light will turn off as the resident gets back in bed. Depending on the Nobi model, the light will make use of the LED strips at the top or of the downward-facing light.

    Model 

    LED Strip lights

    Gen 1 

    LED strip lights

    Gen 2.0

    No LED strip lights

    Gen 2.1

    LED strip lights

    Why

    The night light is there to help prevent falls, especially at night when residents go to or from the bathroom. It helps by providing the resident with a clear path to the bathroom, making it easier to see and move around safely. When a resident moves to sitting on the edge of their bed, the light will illuminate a soft light. The light then turns on fully as soon as the resident gets out of bed, helping them to see and find their way.


    How does the Night Light work?

    This automatic feature is triggered by detecting someone at the edge of the bed. It's therefore not recommended for residents who may often sleep restlessly, moving their limbs over the edge while sleeping, as it might unintentionally turn on the light.

    The functioning of the Nobi night light varies slightly across different models. Here’s a brief overview of how it operates:

    Action Nobi with LED strips at the top Nobi without LED strips at the top
    Sitting on edge of bed to get in bed The downward-facing light turns off, and the upward-facing light turns on. The light shines softly
    Lying down in bed  Both lights turn off  The light turns off 
    Sitting up straight or at the edge of bed The upward-facing light turns on. The light shines softly
    Getting out of bed The downward-facing light turns on, and the upward-facing light turns off. The light turns on at full capacity

    When enabled, the night light is active day and night.

    Please note: the Night Light feature is only available for single-person housing units and individual rooms in a Jack & Jill housing unit. The night light will not work as it should if two people sleep in the same bed. This because if one person gets out of bed, the night light will still detect a person in bed thus not turn on. Therefore, it is not possible to enable the Night Light in multi-person housing units.

    While it is possible to adjust the brightness and warmth of the light, it is not possible to change the color of the light.

    Activating the Night Light

    Setting up the night light for a resident is simple and can be done under Residents in the left menu.

    Please Note: Smart monitoring must be enabled in order to use the Night light feature. 

    You can also have an overview of your residents' Housing Unit settings via the Resident Insights.

    Detailed Steps

    1. Go to Residents in the left menu.
    2. Click on edit next to the resident you want to enable the night light for.
    3. Go to the Housing unit tab.
    4. Enable the night light switch to ON.
    5. Click Save.
    6. A green banner will confirm the changes.

    You have now enabled the night light for this resident.

    Still have questions? Contact Nobi Support.

  • How to Configure Smart Monitoring

    In this article we’ll go over practical use of the smart monitoring feature and how to enable it.

    3 min task

    What

    The Nobi smart light is more than just a light source. With the resident’s permission to share images and/or poses, it becomes a smart assistant. With smart monitoring enabled in the privacy settings, all smart features of the light become accessible. Smart monitoring is also a prerequisite for enabling Monitoring Events. If smart monitoring is disabled, the light will only function as a light source.

    Why

    The resident will always decide whether the Nobi light can be a smart light by giving permission to share images and/or poses. These allow for fall detection and prevention, which can have a big impact on the resident’s life. If, however, the resident decides not to share images and/or poses, you can very easily disable smart monitoring. After this, the light functions just as a light, and you don't need to move it to a different location.


    Enabling smart monitoring 

    Enabling smart monitoring is simple and can be done under the resident’s privacy settings.

    You can also have an overview of the resident's privacy settings via the Resident Insights.

    Detailed steps

    1. Go to Residents in the left menu
    2. Navigate to the resident for whom you want to activate the smart monitoring and click on edit.
    3. Go to the Privacy Settings tab.
    4. Enable the smart monitoring switch to ON.
    5. When you're finished click Save.
    6. Now Smart Monitoring is enabled. 


    Still have questions? Contact Nobi Support.

  • How to Configure Sound Volume

    In this article, we’ll walk you through how to change the volume light and why you might want to do that.

    3 min task

    What

    Every Nobi and Nobita light has a built-in speaker. The overall volume of all messages and as well as the two way communication can be easily adjusted in the Nobi application.

    Why

    Adjusting the volume of the light is crucial for ensuring clear communication. Residents with hearing difficulties may require the volume to be increased to hear the voice for fall confirmations, greetings, or for effective two-way communication. Conversely, if the volume is too loud for some residents, reducing it can enhance their comfort. 

    Setting the volume to an appropriate volume ensures that all residents feel safe and supported, especially after a fall.


    Changing the volume 

    Changing the volume of the light is simple and can be done at the level of the room/light.

    Detailed steps

    Adjusting the volume of the light.

    1. Go to Housing units in the left menu.
    2. Select the unit where the light is installed and click Edit.
    3. Go to the rooms tab.
    4. Choose the room with the light whose volume you want to adjust. Tap on the three dots in the room.
    5. Select Set volume.
    6. Use the + or - buttons to increase or decrease the volume. the light will produce a clicking sound to demonstrate the volume level when the buttons are pressed.
    7. Once the desired volume level is set, click on back to save your settings.

    You have now changed the volume of the light.

    Still have questions? Contact Nobi Support.

  • How to Configure Light Colour

    In this article, we’ll walk you through how to change the colour of the light emitted by the light.

    3 min task

    What

    Depending on the needs and preferences of a resident, you are able to change the colour of the light which the light emits. Please note, doing so may affect the natural circadian rhythm built into the light.

    Why

    You may consider adjusting the colour of the light for various reasons. A resident might prefer the cosy feel of a warmer light, whereas care staff could find a brighter, colder light more beneficial—especially for tasks like drawing blood from residents, where clearer visibility is crucial.


    Changing the colour of the light

    Changing the colour of the light is simple and can be done at the level of the light/room.

    Detailed steps

    1. Go to Housing units in the left menu.
    2. Choose a housing unit and click edit.
    3. Go to the rooms tab.
    4. Click on the three dots below the room where you want to change the color of the light.
    5. Next, click set lights.
    6. Adjust the slider to select your preferred light colour, and then click back when finished.
      You can also adjust the brightness of the light here as well.
    7. When you're finished, click back.

    You have now changed the colour of the light.

    Still have questions? Contact Nobi Support.

  • How to Configure Light Intensity

    In this article we’ll walk you through how to change the intensity of the light emitted by the light.

    3 min task

    What

    Depending on the needs and preferences of a resident, you are able to change the intensity of the light which the light emits. 

    Please note that doing so may affect the natural circadian rhythm built into the light.

    Why

    Adjusting the intensity of the light can be beneficial for several reasons. Some residents may need brighter light to read comfortably, while others might prefer dimmed lights in their bedrooms to create a relaxing atmosphere. 


    Changing the intensity of the light

    Changing the intensity of the light is simple and can be done at the level of the light/room.

    Detailed Steps

    1. Go to Housing units in the left menu.
    2. Choose the housing unit you want to change the light intensity in and click edit.
    3. Go to the rooms tab.
    4. Click on the three dots below the room where you want to change the intensity of the light.
    5. Next, click set lights.
    6. Increase the brightness by clicking the +, decrease the brightness by clicking the - until you reach the desired brightness. (You can also change the color of the light here as well by adjusting the coldness of the light.)
    7. When you are finished, click back.

    You have now changed the intensity of the light. 

    Still have questions? Contact Nobi Support.


  • How to Add a New Housing Unit

    This article will walk you through what a housing unit is and how to set one up.

    5 min task

    What

    In the Nobi application, a housing unit is where a resident lives. It can be just one room or several rooms together. For instance, a resident might live in an area with a bedroom, bathroom, and living room. All these rooms together make up one housing unit. To set up the lights for these different rooms, we first need to create a housing unit that will include all these rooms.

    Why

    Adding a housing unit is necessary in order to add the lights for this resident. By creating different housing units, you create an organised structure within your organisation.


    Adding a new housing unit

    Let’s say we want to add a new housing unit in our existing department. Below are the steps we need to take.

    Detailed steps

    1. Click on housing units in the left menu.
    2. Click + Add in the top right corner. 
    3. Choose the type of housing unit.
      (Want to know more about the types of housing units? Check our page Type of housing units)
    4. Give the housing unit a name.
    5. Assign the department the housing unit will be part of.
    6. Optional, set up the wifi for this housing unit. If you leave this empty, Nobi will default to the wifi at the department level.
    7. When you’re done, click Save.
    8. A green banner will confirm the creation of the housing unit.


    You have now created a new housing unit.

    Still have questions? Contact Nobi Support.

  • How to Configure WIFI

    This article will walk you through the setup of WIFI for your Nobi Smart Light. Learn how to configure WIFI settings at different levels within the organisation for the first-time setup.

    3 min task

    What

    Setting up the WIFI for your Nobi lights is essential for effective fall detection and prevention. You can configure the WIFI on two levels: department and housing unit. All lights will use the WIFI settings from the lowest level specified. To ensure optimal performance of your Nobi lights, it's important to choose the appropriate level for this configuration. Additionally, your Nobi lights need to meet specific internet requirements to function properly.

    Why

    Proper WIFI setup is crucial to ensure that every light has the best possible internet connection, allowing them to perform optimally. This guarantees that in case of an escalation, you will be promptly notified and can quickly assist the resident in need.


    Setting the WIFI

    When setting up a network with multiple access points, it’s important to match the correct network to the correct location. Most locations within one group may be best served by one specific network due to proximity. However, some exceptions within the same group might be closer to a different network. In such cases, we assign the different networks to different levels or categories, so each location connects to the network that offers the best performance.

    Please note that Nobi does not support WIFI connections that require a captive portal.

    Detailed steps

    First, we will set up the WIFI for the department. After this, we’ll choose another network for a housing unit:

    1. Go to Departments in the left menu.
    2. Find the department and click edit.
    3. You will land on the basic info tab, here you must first choose your WIFI security type.
    4. Depending on the type you choose, Nobi will ask you to fill in the requested information below and click save.

    Now we will choose another WIFI network for a housing unit

    1. Go to Housing units in the left menu.
    2. Choose the housing unit and click edit.
    3. Again, you will land on the basic info tab, here you must first choose your WIFI security type.
    4. Fill in the requested information below and click save.
       

    You've now configured the WIFI in both a department and a housing unit.

    Still have questions? Contact Nobi Support.

  • How to Create Users with a Professional Email

    Find out how to set up a new user with a professional email in the Nobi application and learn how the user activates their account for the first time.

    3 min task

    What

    To access the Nobi application, each person must be registered as an individual user. A user with a professional email address signs in using their email and password.

    When creating a user, you assign:

    • A role (manager, user, or technician)

    • Access to sites / communities or departments 

    The role determines what the person can see and do and what information they can access. You can learn more about users in the Nobi application here.

    If a role is assigned on a higher level, such as at the account level or site / community, it automatically applies to the lower levels like the departments within. You can always adjust this manually if needed.

    Why

    Each person needs their own Nobi user profile for privacy reasons. Do not use shared accounts.

    By assigning the correct role and limiting access to specific sites / communities or departments, you protect resident data. Users only see what is relevant to their responsibilities.

    Using a professional email addresses ensures secure authentication and a clear activation process.

    Adding a user

    Please note that this action can only be completed on the Nobi web application via the User management page. Access to this page is restricted to managers only.

    Detailed steps

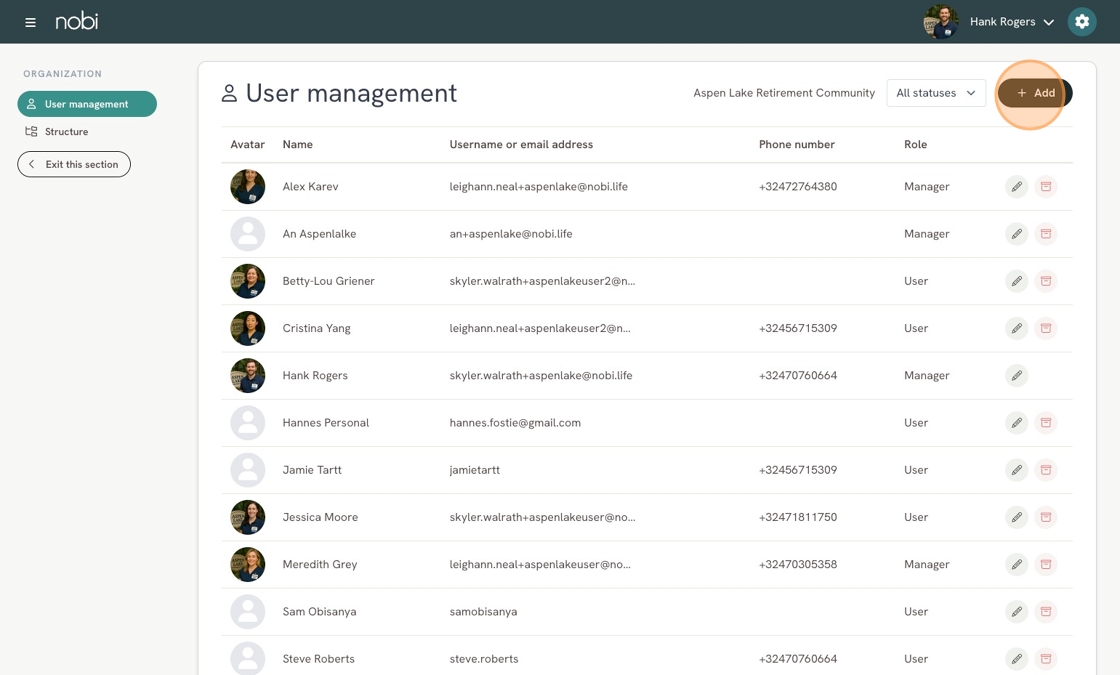
    1. From the Dashboard, click on the cog in the top right corner to navigate to the organisation menu. You will land on the user management tab.
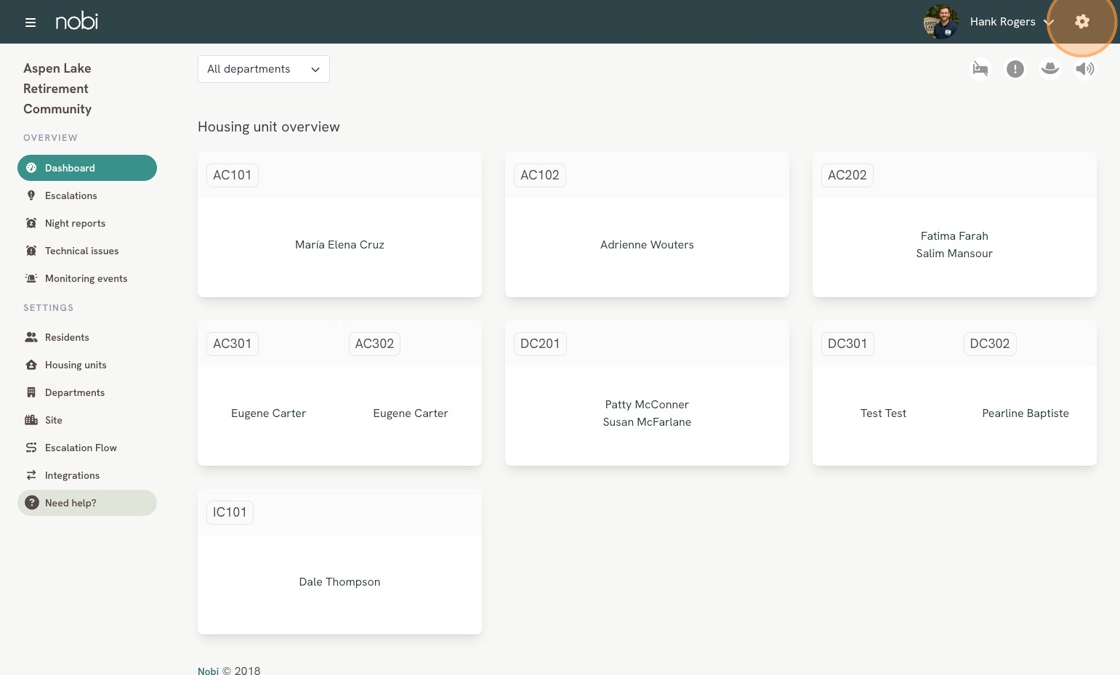
    2. Click on + Add to add a new user.
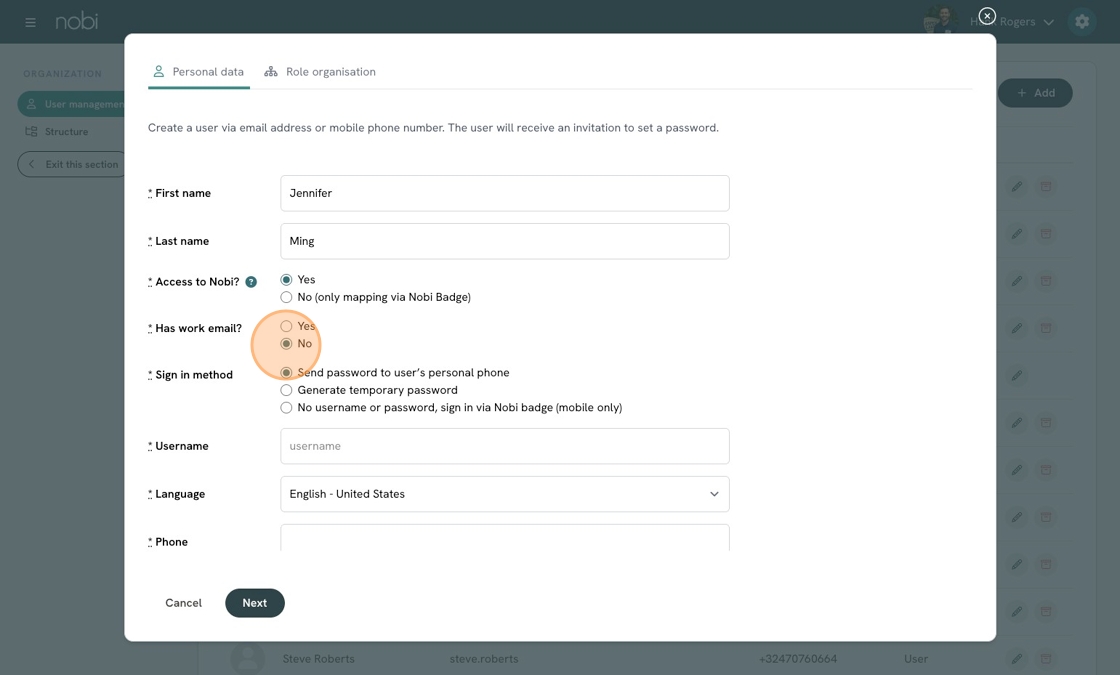
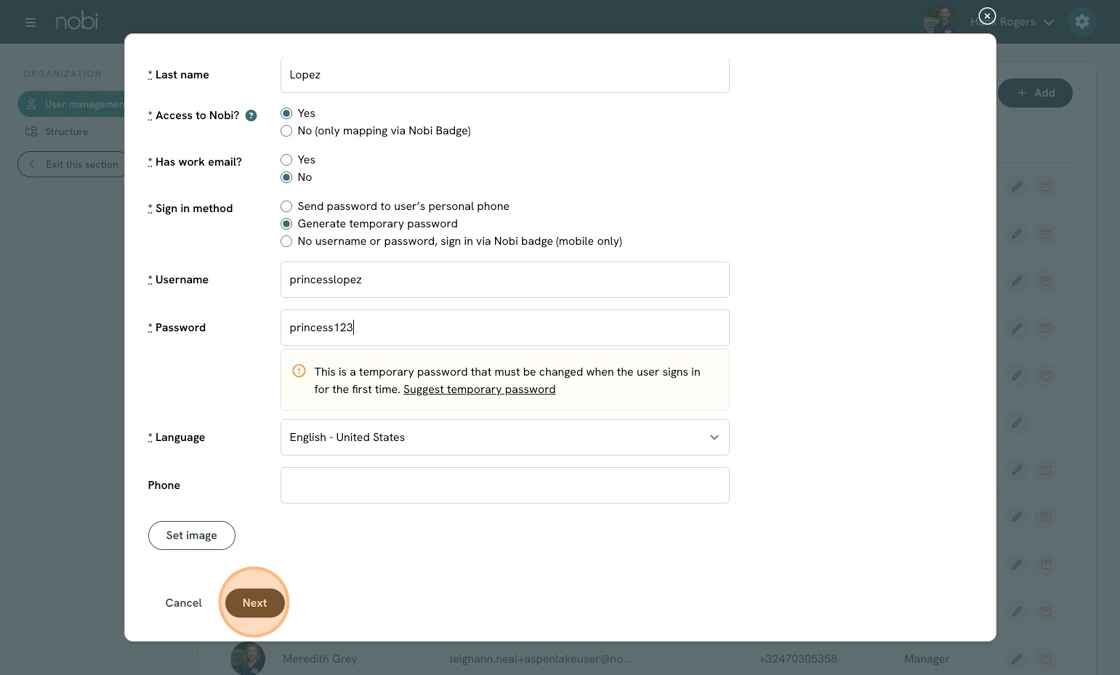
    3. Enter the user’s first and last name, set Access to Nobi to YES and Has work email to YES, then enter the user’s email address (this will be used to sign in). Select the user’s language and optionally add a phone number—if added, the user will be selectable in the escalation procedure—and a profile image. Once all required fields are completed, click Next.
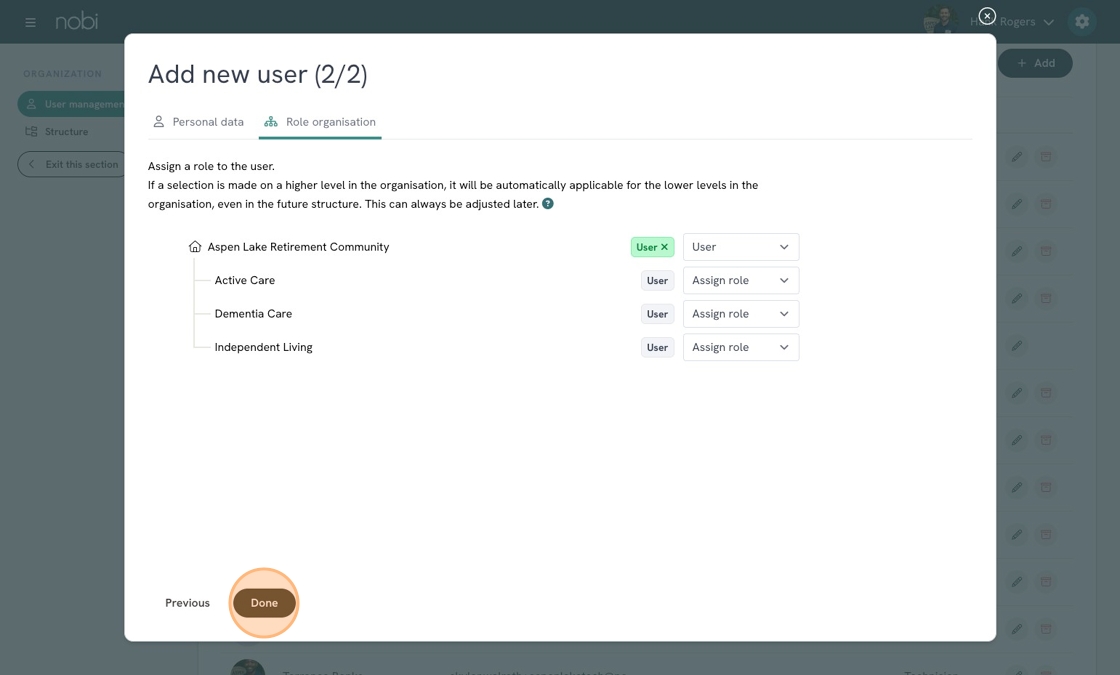
    4. Now you can assign the role(s) you want to give this user using the drop down menu. You can add multiple roles to multiple sites / communities, clusters, departments, or the account.
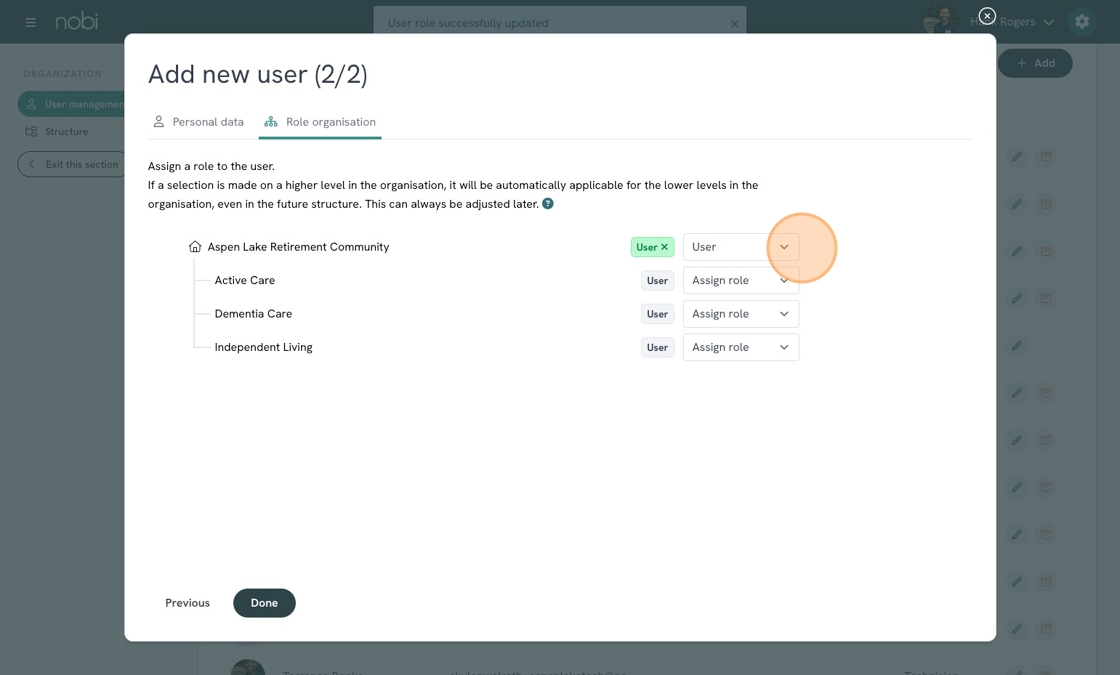
    5. When you're finish press Done.
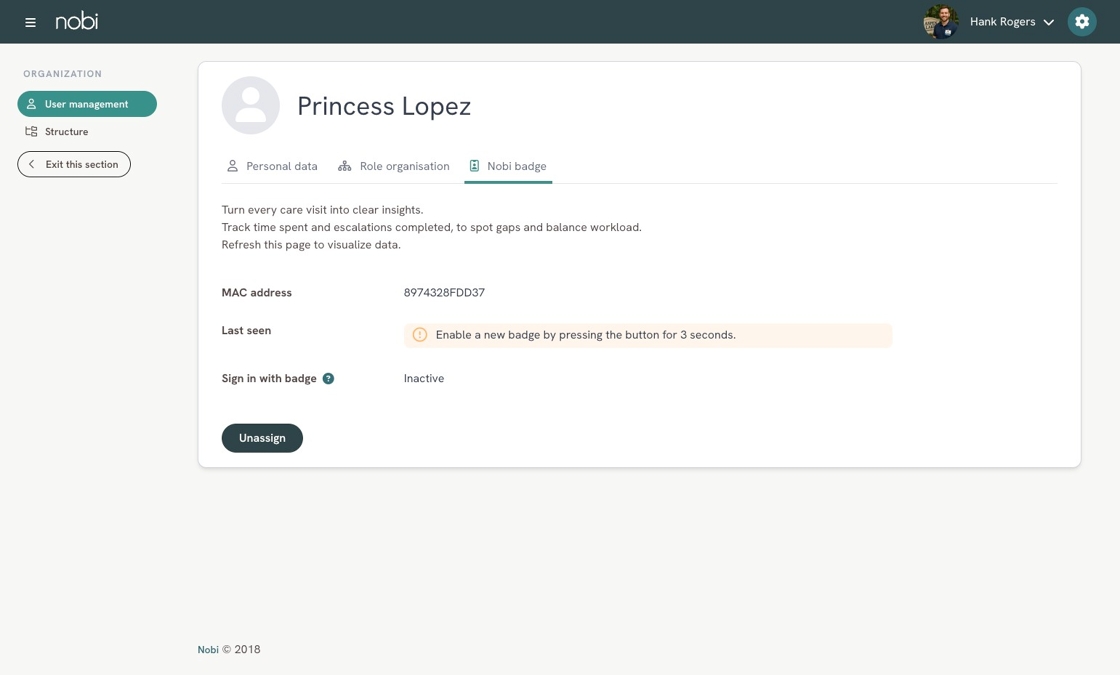
    6. You will then have the optional step of assigning that user a Badge. If you would like to assign the user a badge, click Assign.
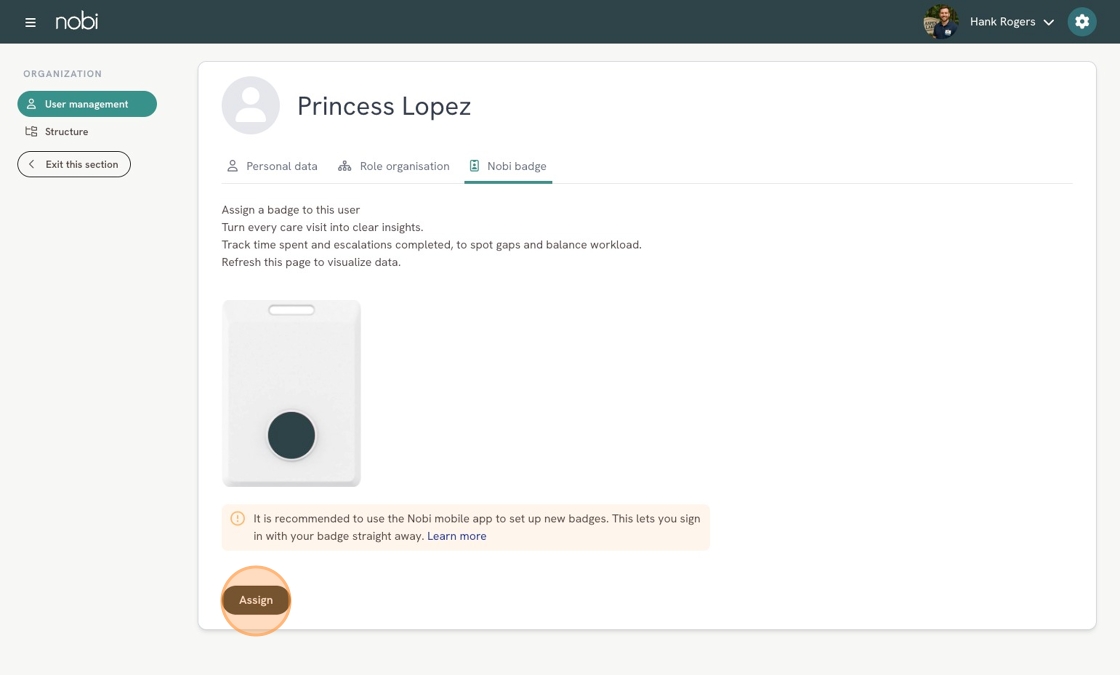
    7. Next, enter the MAC address of the Badge. It can be found on the backside of the Badge.
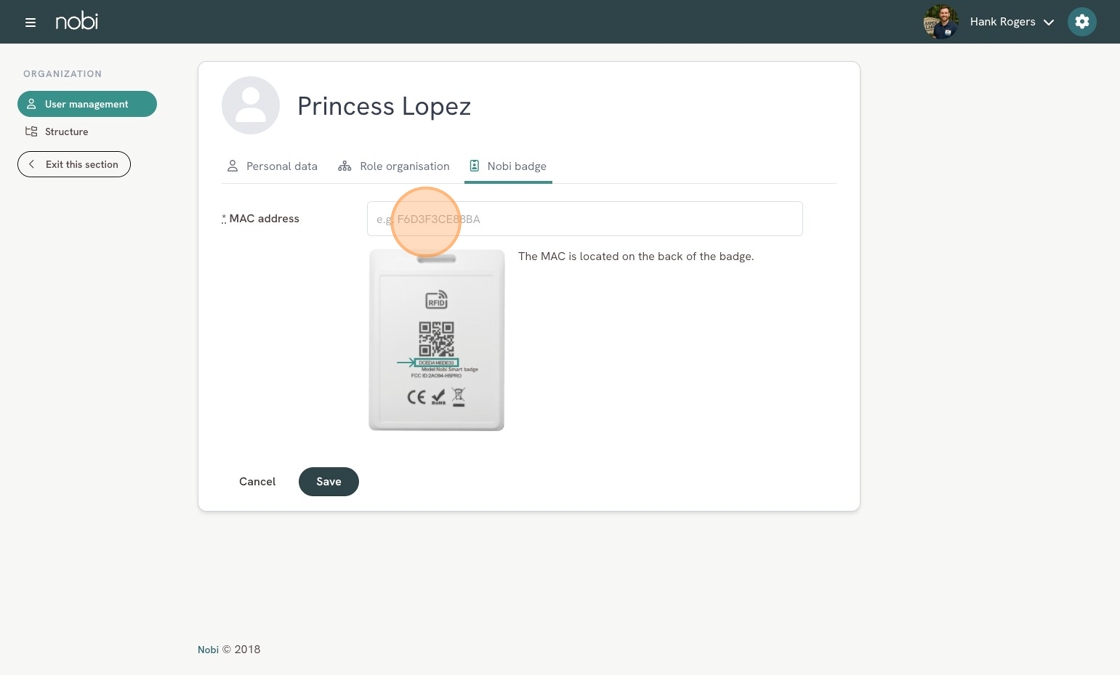
    8. When you're finished, click Save.
    9. The new user will now have a Badge assignment. However, the user will not be able to use the badge until they complete the user creation process below. 
    10. The new user will receive an email with instructions to activate the new account. To activate the account, the new user will need to open the email and click on set password.
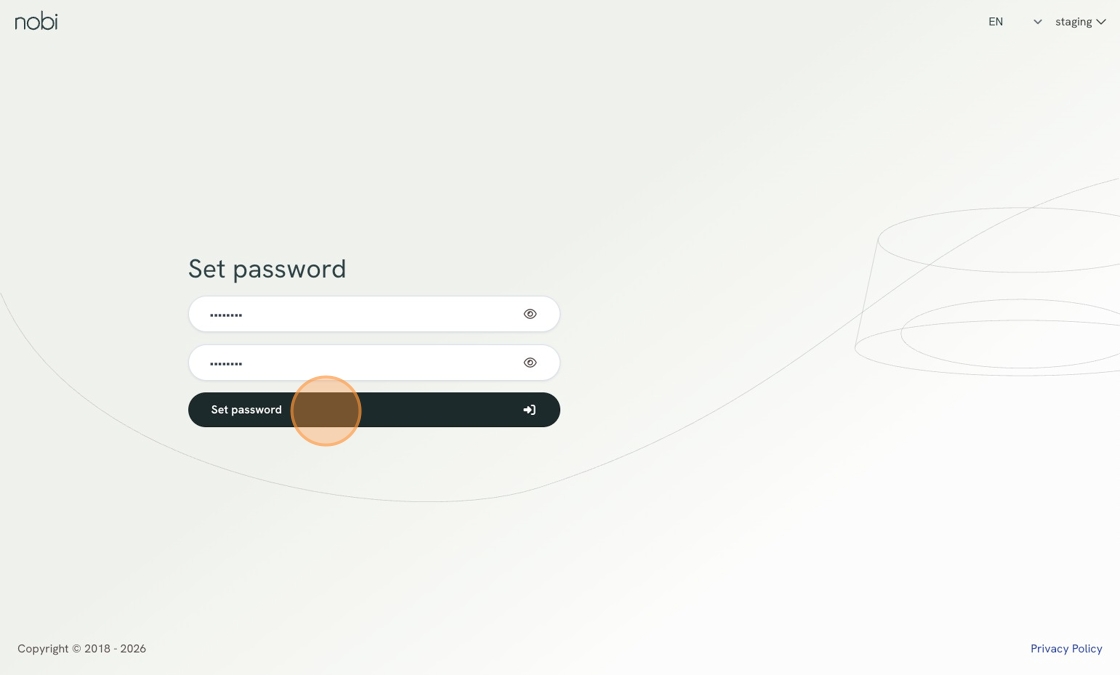
    11. The new user should now fill in the password they want to use to log in and confirm it below, pressing Set password.
    12. Note, that the new user will also receive a verification code, verifying their registration, depending on if a phone number was provided.
    13. If logging in on using the Nobi Mobile App, Nobi will ask whether or not to trust this device in the future. Trusting the device will prevent regular authentication checks when signing in.
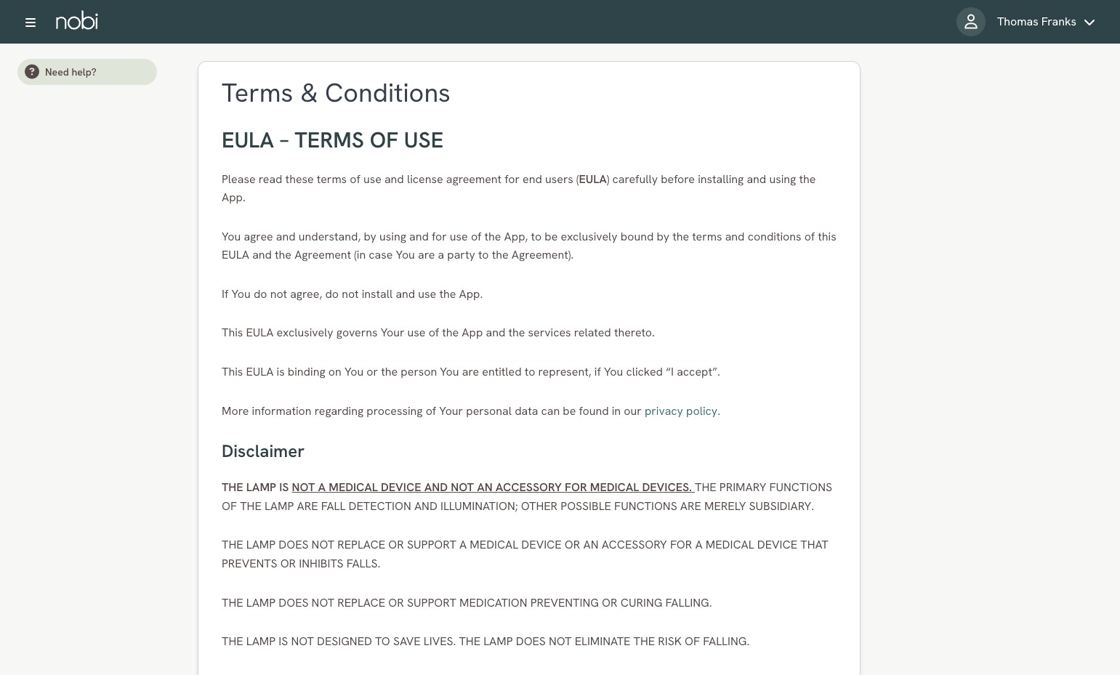
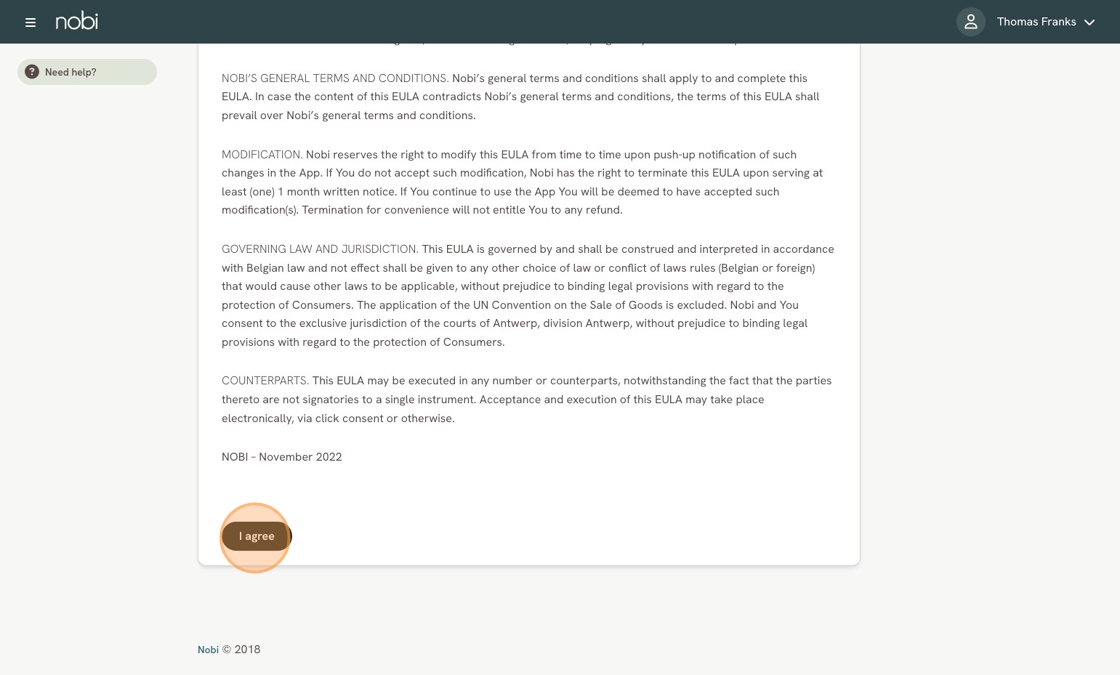
    14. After setting their password, the user will be prompted to read the EULA - TERMS OF USE
    15. Once the Terms & Conditions have been read, the user can accept them by pressing I agree.
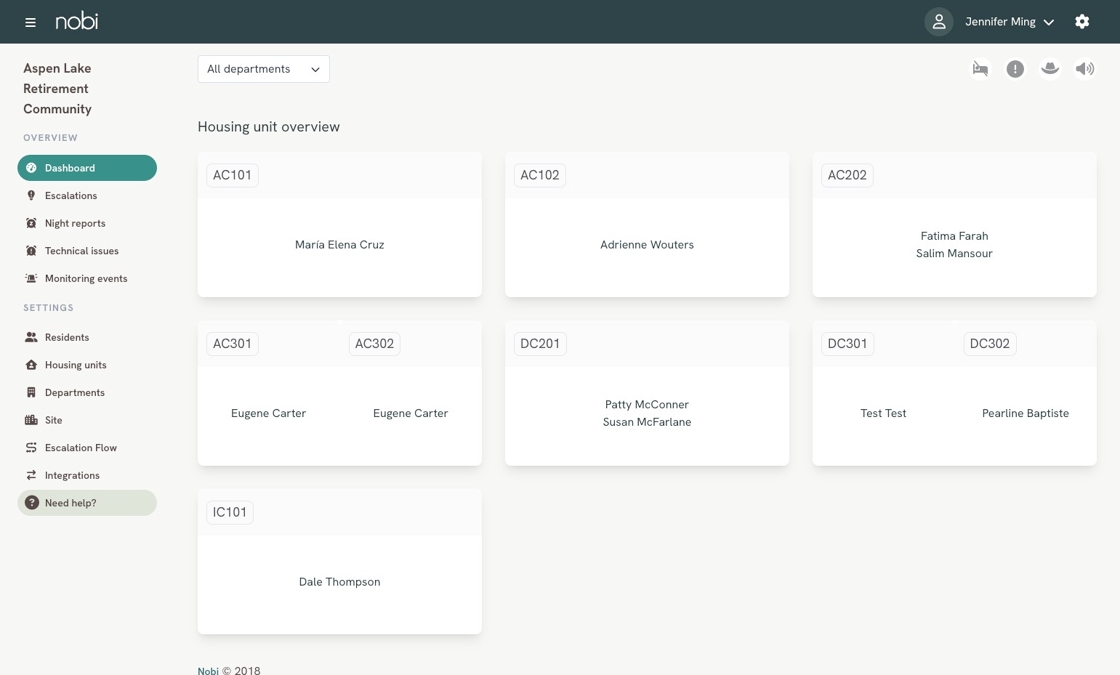
    16. The new user is now created and signed in. They will now see the Desktop of the site / community they were created in.
    Creating more users? Follow our step-by-step guides below to create a user using the following methods:

    How to create users without a professional email (phone)

    How to create users without a professional email (IP filtering)

    How to create a badge only user with access to Nobi

    How to create a badge only users without access to Nobi

    How to assign a Badge to a user using the Nobi Mobile App
     

    Still need further assistance? Please contact Nobi support

  • How to Add a New Department

    In this article, you will learn what a department is and how to set one up.

    5 min task

    What

    Every site / community needs at least one department to operate. Departments are used to group housing units. Depending on the size of your organization, you may need more than one department. More departments will allow for more differentiation within your organization.

    Why

    A department can be a certain floor in your organization or a group of housing units.
    Having different departments allows for a different way of working and reporting depending on the department. Each department can have a unique escalation procedure which is best suitable for the department and care staff. When you have multiple departments, the dashboard and other reports will feature filtering options, allowing you to sort data by different departments.


    Setting up a department 

    You can easily create your first department or add more under Departments in the left menu.

    Detailed Steps

    1. Go to Departments in the left menu.
      Add a New Department to Nobi Cloud - Step 1.png
    2. Click on + add in the upper right corner.
      Add a New Department to Nobi Cloud - Step 2.png
    3. Choose the type of department
      Add a New Department to Nobi Cloud - Step 3.png
    4. Fill in the name of the department
      1. If you do not want to set the wifi on this department level, click save. You have now added a new department.
        Nobi Workflow - Step 1 (12).png
      2. If you do want to set the wifi on this department level, select the right WIFI security type and fill in the required fields to set up the wifi. In this case, we’ll choose for ‘WPA Personal’ which requires us to fill in the WIFI SSID and the WIFI password. Once filled in, click save. For more information about setting up the wifi, go to set WIFI.
        Add a New Department to Nobi Cloud - Step 21.png

    You have just created a department. You will see a list of departments.

    Now you can start adding housing units to your departments. Unsure of how to do this? You’ll find all the information on adding a new housing unit here.

    Still have questions? Contact Nobi Support.

  • How to Edit Site / Community Information

    In this article, we'll guide you through updating the basic site / community information in the Nobi application, ensuring your Nobi light functions correctly.

    5 min task

    What

    Filling in the right site / community  information in the app is key for setting up Nobi accurately. It's also important to update the site / community  information if anything changes.

    You can also customise the monitoring event sound that will play on the dashboard at the site / community  level. To learn more about sound settings, visit our guide here.

    Why

    It’s important to set the correct site / community  information for your Nobi light to function as intended. Most importantly, selecting the correct time zone ensures that the timing of any escalations is displayed correctly, as well as Resident insights data, and night reports

    With the correct info, Nobi adapts to your situation and you have access to the correct data.


    Detailed Steps

    1. Go to Site / Community  in the left menu
    2. By default, you'll land on the Basic Info tab. Here you can change:
      • The name
      • The street & house number
      • The postcode
      • The town
      • The measurement system
      • The language
      • The time zone
    3. Once you have entered the correct information, click save.
    4. A green banner will confirm the changes

    You have no updated the basic information at the site / community level.

    Still have questions? Contact Nobi Support.


  • How to Resend an Invitation for a New User

    Learn how to resend the registration email to a new user who didn’t complete their setup in time.

    1 minute task

    What

    You can resend a new invitation to users whose original email expired or was not used.

    Why

    The registration link in the original email expires after 3 days. If a new user hasn’t registered in time, they won’t be able to access the platform. Resending the invitation gives them a fresh link to complete their registration.


    Detailed steps

    To resend the registration email to a new user, follow the steps below:

    Please note: this action can only be completed on the Nobi web application via the User management page. Access to this page is restricted to managers only.

    1. As a manager, click the gear icon in the top right corner of your screen to access user management. 
      Resend Nobi Invitation to User - Step 1.png
    2. Look for a yellow exclamation mark next to their profile image. You’ll find unregistered users by checking for a yellow exclamation mark next to their name in the user list. From there, you can resend their invitation directly. Click Edit next to the user’s name.
      Resend Nobi Invitation to User - Step 2.png

    3. Click Resend invitation in the yellow box below their email address.
      Resend Nobi Invitation to User - Step 3 (1).png

    The new user should now have received a new registration email. 

    Still have questions? Contact Nobi Support.